Thanks to Google Drive’s workspace, you can store all your important documents and files and enter them from every device. Moreover, every member of your team can view, edit or comment on these paramount documents and you can access them as a group.
However, the G Suite can become very crowded, and you may overflow it and lose yourself when you want to find something quickly and effortlessly. But, a few good opportunities will help you be constructive, and in this article, you can learn how to organize Google Drive for business.
When your Google cloud becomes messy, you must spend some time arranging things in the right way. This will help you and make everything more attainable for yourself and your colleagues. The favorable features of Google Drive will give you a helping hand, and we will show you how to use them properly and organize everything from A to Z.
This is the first step if you want to clear the clutter and make your workspace shiny and attractive. After reading this captivating article, you will know how to coordinate everything on the drive and save yourself time and effort in the future.
How To Organize Google Drive For Business
Create a Folder Structure
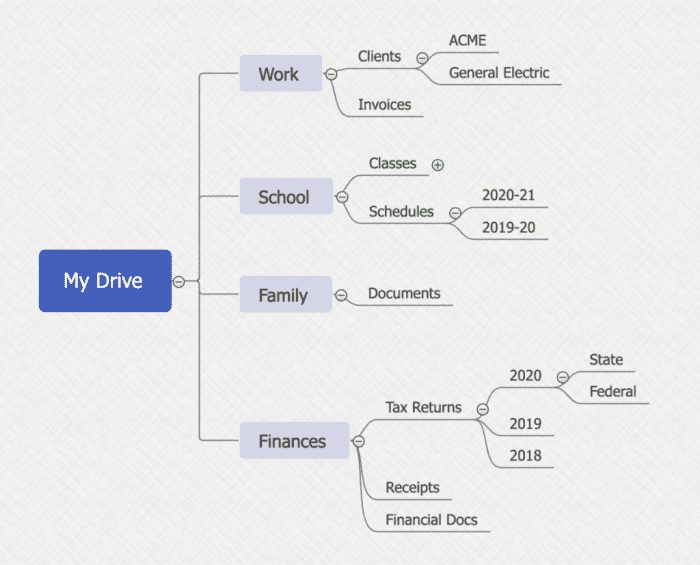
The first thing you have to do when you start organizing your Google Workspace is to create a sleek and neat folder structure. You can place each category of work in a distinct folder, and you can even make some sub-folders for specific documents.
Uncategorized Work Folders
When you can’t fit something in a categorized folder you have already formed, you can easily open one specific folder and name it “uncategorized work.” You can put everything that still isn’t falling into a particular place there. However, don’t forget to go through the files and documents in this folder often because if you don’t, they may pile up and create another mess to handle. When you check them regularly, you can move them to the labeled folders as soon as they find their place.
New Folders
When you have your folders set up and ready, you can scan them weekly and notice if everything is where it should be. When something new arrives, you can efficiently put it in the right place. When you have to create another new folder, don’t forget to label it, as you did with the others.
To create a folder in Google Drive, you must follow one easy step. Click on the “New” button on the left top side and select Folder.
Color Up Your Workspace
Another exciting feature that can help you organize is the coloring of folders. When creating folders isn’t enough, you can arrange things further with some magnificent painting. By adding some joy with the gorgeous colors, you’ll be able to access and locate even faster.
Splash some glow on your important folders
You might ask how to organize Google Drive for business with color-coding. The first tip is to color all your important folders with a distinct shade and the sub-folders with another hue of the same color as the linked folder. Another suggestion is coloring the folders by the month you did the work. For instance, you can color September in purple or March in yellow. It’s all up to you.
When the members of your Google Drive go through the cloud, they can easily find everything just by the color. If everyone on the team knows something particular is in blue, they won’t even have to read the labels.
Dye the finished projects folders
Lastly, you can create a folder with concluded work and color it in the shade of your choice. Place all finished files and documents there and tell your employees to do the same. That way, your drive will become even more polished.

How to color a folder on Google Drive?
If you want to color a folder, click the right arrow on the folder’s name on the top bar and choose the “Change color” option. You will be offered with a palette and you can choose the one that suits the folder.
Name Every Document
When it comes to dates on Google Drive, you will have to right-click on a file to see when it was created or modified. And that may take a lot of time. Indeed, you won’t go through every document and check separately, especially if you have a lot of them. That’s why naming and dating the files and documents is vital.
Arrange everything by title and date
The best way for naming conventions is to include the date and the type of the project on the folder and the documents to make things straightforward. When you concretize, you will easily find the needed files without checking details. This will help you a lot, primarily if you work with deadlines.
For example, if there’s a folder dedicated to finances, you can stick a specific month to its name. You can be even more concrete with the sub-folder and add a full date. That way, you and your colleagues could reach everything more simply and conveniently.
How to name or rename on Google Drive?
Even though naming or renaming documents can take time, it’s one of the critical tips. To name, you have to select a file and, with right-click on the mouse, choose the option “Rename.” On the other hand, when you first create a new folder, Google will immediately ask you how you want to name it.
Star Some Files
It would be best if you always starred essential and often accessed files. At least, that’s what we answer when someone asks how to organize Google Drive for business. Starring the documents can even further arrange the Drive.
Underline vital projects and unstar finished ones
You won’t lose track of crucial files and documents that always need to catch your eye by fixing a lovely little star. This star will highlight the file, and when you browse through the Drive, you will quickly notice it. Nevertheless, don’t forget yourself with the starring option. Equally, remember to unstar when you are done with a project, or it becomes less consequential. Because having too many documents that hit the spotlight may become chaotic, or you may confuse other team members.
How to star a file on Google Drive
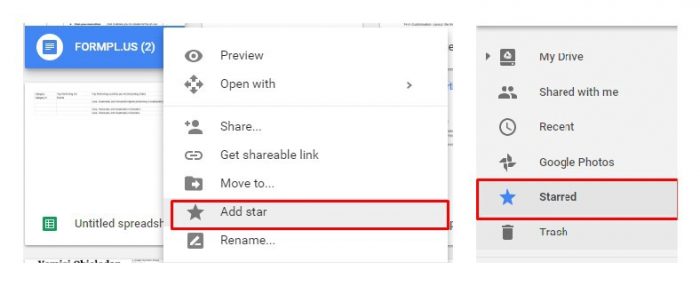
When found, you have to right-click on a specific file when found and select. There, you will discover the “Add to starred” option. When you click it, a bright star will appear on the file.
To further access your starred documents, you have to find the “Starred” tab, which you can locate on the left side of the Drive with a star icon attached to it.
Archive or Delete Everything Unnecessary
We all sometimes keep things we don’t need. Yes, essential files, documents, photos, projects, or folders from the past can be maintained and reaccessed. Yet, when using Google Drive for business, there will be numerous old files from tasks long ago accomplished, and they will only take up room and make the cloud overflown.
Archive old data and delete finished and irrelevant files
If you don’t want to delete something, we understand. In that case, you can create an “Archive” folder and move the old to make space for the new.
In contrast, when you are sure something belongs in history, you can remove it altogether. You can do this monthly and empty the Drive from unnecessary files no longer in use. Carefully separate what you may need in the future, and place it in the “Archive” folder. Then, delete the files that 100% have done their deal.
How to delete on Google Drive?
To delete on Google Drive, you must click on a file and pick “Remove.” Still, we must mention that when you “Remove” a file from Drive, it’s not deleted permanently in that particular wink. Instead, it’s moved to the “Trash,” which you can access on the left-hand bar. Ultimately, you can recover files from the trash in 30-days. After, they are permanently deleted.
When you work on a team, every individual may share a file with you from their Google account. Or, in opposition, the person may not even be on your crew and give you access to a crucial document that you need to enter and review.
You can find the “Shared with you files” by clicking on the “Shared with me” option on the left sidebar. There you can find everything that someone has transmitted to you.
When you enter the “Shared with me” folder, you can select a file and click on the right-mouse-click to choose “Add shortcut to Drive.” That’s how you will always have access to the files on your personal Drive without constantly entering the “Shared with me” folder.
Arrange the transferred files
Eventually, don’t forget to organize shared files on your Drive too. It would help you if you created an exact folder that you will name appropriately and put all shared documents or files into it. And, as you know by now, you can add some fantastic color to it.
Use the “Search in Drive” Opportunity
One of the main advantages of Google Drive is that you can always locate something through the search bar. Well, we are talking about Google, the most excellent search engine of all time. Thanks to the advanced search, which you won’t miss because it’s on the top of the page, you can quickly access important documents. Just enter a name or a keyword, and Google will list your file in front of you.
Take your search further with some additional tips
When you enter a word in the search bar, you will detect that you can do some advanced search with the options on the right side of the bar. First, you can select which type of file you are looking for. Is it an image or a Google Docs document? No problem, you can set everything there. Second, you can choose who the file owner is, or did you create or someone else did? Third, you may write keywords or terms that match the file’s name. And all this goes even beyond. You can choose where google should locate the file and when it was last modified or was it shared with someone. All of these opportunities will help you find your desired file in a jiffy.
Utilize the “Recent” Folder
Lastly, this may not be a tip for organizing your Google Drive, but accessing and utilizing the “Recent” folder when you work may save you much time.
In detail, Google recommends you with the documents you opened recently. Or someone else did. So, if you want to save a few minutes and don’t want to move through folders and names, you can click the “Recent” button on the left sidebar. There, every document will be listed according to the date you or someone else last opened it or modified it.
Conclusion
Well, we came to the end of this article, and we hope that we gave you a lot of insight and answers to the most critical question today: How to organize Google Drive for business?
We ourselves went through all tiny bits, inspected everything, and included all tricks and prompts that you may not have known till now. Now, full of knowledge on one of the most used workspaces today, the G Suite, you can turn the page and start arranging and organizing.
By organizing your drive and employing our bits of advice, you will even expand your understanding and may become an expert in the field. Google Drive isn’t a complicated platform, and we are sure that you are a quick learner.
Keep in mind that Google improves G Suite very often. However, many of the included opportunities we mentioned are long incorporated into its algorithms. If something, Google may advance things further and give you even more options in the future. So, good luck with your work, and we hope you’ll make the most out of Google Drive.